Loose Florals Using Watercolor

In this article, I will share with you the loose watercolor technique I often use. You can check out my instagram page, @lapisatbrotsa, to see some of my works where I used this technique.
This method is easy, cheap (since you can only use 2 colors), and beautiful. It is good for beginners and it is definitely a great way to spice up your calligraphy piece or any watercolor painting. So, let's start.
Materials needed

- Watercolor Paper
- Watercolor (cake or tube)
- Watercolor Brush
- Pencil
- Waterproof Pen (i.e. Sakura Micron Pen)
- Water
- Tissue/ Kitchen Towel
Watercolor Paper
I highly recommend using watercolor paper, but you can also use other paper such as vellum as long as it can handle water well. Photocopy paper or regular office paper is not good for this piece since it will warp and even break when you apply watercolor on it.
 |
| You may purchase cheap watercolor paper such as Fabriano and Canson Watercolor Paper in local bookstores (i.e. National Bookstore) for around Php 60.00 per pack. Each pack contains 10 sheets of 200 gsm acid-free watercolor paper. |
Watercolor Paint
You can use any watercolor paint that you have. If you are using watercolor cakes (i.e. Simbalion and Prang), you only need the red and the green paint for this technique.
 |
| My old Simbalion Watercolor. This is the first watercolor I used. It is definitely affordable, easy to use, and it produces really vibrant colors. |
Watercolor tubes are also great to use since you can buy them in pieces or sets depending upon your needs and budget. There are also a lot of cheap watercolor tubes that you can buy such as Reeves, Pentel, and For Studio brand. For this piece I used For Studio Watercolor in Rose Red and a very old Guitar Watercolor in Olive Green.
 |
| These colors can be changed depending upon your preference, but rose red and olive green are the colors I used in the demo |
Watercolor Brush
A round watercolor brush is necessary for this technique. I am using a round calligraphy brush with goat hair that I bought during my Taiwan trip. This is my favorite brush because it holds water/ink well, it is flexible so I can create different patterns, and it has a nice pointed tip that allows me to create thin lines. It is also definitely a steal since it only costs around Php 170.00, a very low price for such a good brush.This is the brush I use in almost all of my paintings for more than a year now.


Pencil
Pencils are not necessary, however it can be a huge help for beginners. For beginners, a softly-drawn guide will be a huge help in achieving a symmetrical positioning of the flowers. Just make sure that the pencil lines are drawn as soft as possible since it cannot be erased once it is covered with watercolor. Do not use 6B pencils to draw guide lines. Use pencils with lesser amount of graphite such as F or H pencils
Waterproof Pen
Waterproof Pen like Sakura Micron pens will be used to create details that will make the flowers pop.
Color Study
Color Study
You don't need a lot of different paints to achieve a nice loose floral painting. Just two colors will do. You just have to play with the proportions of water and paint . Adding more water creates the softer tone that is used as the first layer of the painting.
Also make sure that you add a color that is a mixture of the two colors to serve as a transition color to create harmony.

Basic Shapes
This loose floral technique is really easy to make and is good for beginners since you only use circles and ovals to create the guidelines.

For a fully-bloomed flower, you just need to draw 5 circles in a circular pattern. The sizes of the circles may be adjusted to create variations. For example, to make the flower appear like it is facing to the right the rightmost circle should be bigger than the other circles.
It is good to create more variations in the sizes of the petals to make the painting interesting and more life-like.
For a semi-bloomed flower, draw 3 ovals right next to each other. And to draw a bud, simply draw an oval.
I also marked the pattern to guide you (orange marker)as you paint the second layer (using a more saturated color). Just keep in mind that more pigment should be put in the middle part of the flower, so add more color or pull color towards the center. However, the middle of the flower should be kept white. This will make the flower pop.
*I think one of the most important things we have to remember about creating a beautiful watercolor painting is that there should be a portion left crisp white
For the leaves, here's the basic shape:

For the leaves, here's the basic shape:

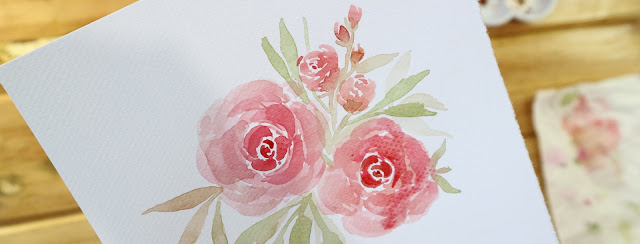
Let's Paint
First, paint the first layer with a very soft shade of crimson red.
Second, add more color. See Basic Shapes to identify the areas that needs more color.
Third, add leaves. I first used a soft tone of the combination of olive green and crimson red to act as a transition color.
Next, add another layer of leaves. This time with more olive green pigment to create variation.
Finally, use your waterproof pen to add details to the flower.
Now, you are ready to make your own loose floral masterpiece.
If you try this technique out and decide to post it on facebook and/or instagram don't forget to tag me so I can see it
Instagram: lapisatbrotsa
Facebook: Lapis at Brotsa
Enjoy!
Watch the video below to see how I used this technique to create a beautiful floral wreath.
Music:
"Bourree 4th Lute Suite – Bach"
(freemusicpublicdomain.com)
Licensed under Creative Commons: By Attribution 3.0
http://creativecommons.org/licenses/by/3.0/
(freemusicpublicdomain.com)
Licensed under Creative Commons: By Attribution 3.0
http://creativecommons.org/licenses/by/3.0/


Comments
Post a Comment